Here's how you can make a durable, cheap and easy-to-make Ear Saver in less than 1 hour. There's no gluing need, so no curing or drying times. No sewing or crocheting required either. All you need are easily available materials and simple household tools.

Materials
- Soda Pop Plastic Bottle
You'll need an empty plastic soda pop bottle (softdrink bottle), like the one below. Wash and clean the bottle and also remove its label.

- Split Pin Fasteners
You'll need two of these. Split Pins are also sometimes called Cotter Pins and are available in office, school or stationery supply stores. A Split Pin fastener has two parts: the head and two tines. The two tines split or separate when the pin is used. The Split Pins shown below are about 1/2 inch long.

Procedures
Preparing the Band of the Ear Saver Strap
- With a sharp cutter or razor blade, pierce the side of the bottle and start slicing with a sawing motion as shown below.

- When the cut hole is large enough, use a pair of heavy-duty scissor to cut off a rectangular and relatively flat (not curvy) section of the plastic.

- With a sharp cutter or pair of scissors, remove the rough edge. With a cutter, use a straight-edge like a ruler to create an even and straight cut.
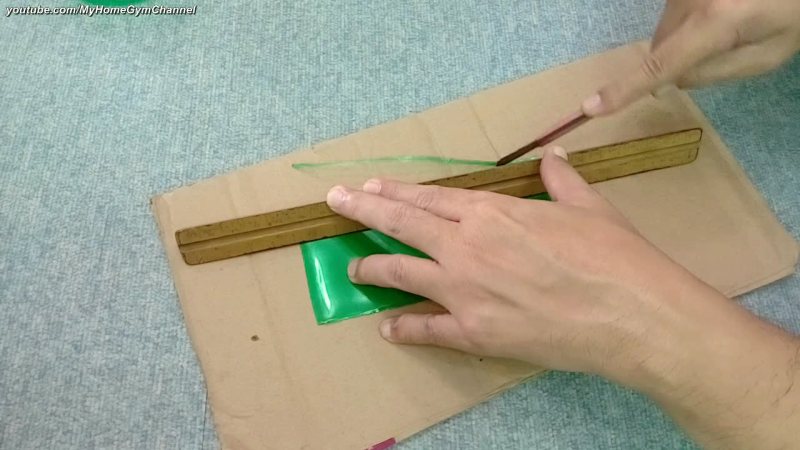
- To create the band, measure a long narrow rectangle that is 1/2 inch wide and 7 inches long. The measurements mentioned in this article are relativie and will depend on your own requirements. Again, use a sharp cutter or razor blade and a straight edge to make an even and straight cut.
The reason you want the the edges to be even and straight with no jagged edges is because this band is the main component of the strap. If ever it makes contact with the skin or scalp, you don't want any part of it scratching or tickling your neck, head or ears.

- With the heavy-duty pair of scissors, make diagonal or rounded cuts on the four corners of the band. Again, you don't want any sharp corners scratching your skin.

- With a ruler and pen marker, mark two points on the band. These two points are 1/2 inch away from both ends of the plastic band. These points will be the location of the two button hooks that you will be affixing to the band.

- Using a sharp cutter, make a cut at one of the marked points. The cut is 1/8 inch long and should be perpendicular to the length of the ear saver band as shown. The cut is long enough to allow the both tines of the Split Pin fastener to pass through.

- Do the same with the other marked point on the other end of the ear saver band. Although a razor blade is thinner, and most likely sharper, a cutter such as the one below is safer to use.

Preparing the Button Hooks of the Ear Saver Strap
The button hooks are the anchor points on the band where you will be hooking the ear loops of the face mask. The thicker or wider is the ear loop of the mask, the bigger would be the dimensions of the button hooks.
- Cut a portion of the plastic soda pop bottle shown earlier or use another plastic bottle with a different color for variety. This different colored material allows you to easily distinguish the button hook on the band of the ear saver.

- Put a small round flat object like a small coin or metal washer on top of the cut material. The round object's diameter could be as wide as the band (1/2 inch) or slightly bigger. While pressing on the coin on the plastic material, use a fine pen marker to trace the circle shape on the plastic.

- Cut out the drawn circle with a pair of scissors as shown below.

- Make two of these two plastic circles. They will become the button hooks of the Ear Saver Strap.

- With the sharp cutter, make a 1/8 inch (roughly) linear cut in the center of the button hook circle. The cut should be big enough able to allow both tines of the Split Pin fastener to pass through. Make the center cut on both of the button hooks.

Assembling the Ear Saver Strap
Here's where we fasten the button hooks to the band of the Ear Saver strap.
- While holding one of the button hooks, insert the tines of one Split Pin fastener through the cut. Both of the tines should fit and enter through the cut. Push the tines in all the way through.

- Find one of the two cuts on the band that was prepared earlier. While holding the end with one hand, insert the tines of the Split Pin fastener (now with the attached button hook).
Be sure to insert the tines facing the concave side of the band. The concave side is the inside part of the soda pop plastic bottle. The reason for this will be more obvious when the Ear Save Strap is worn.

- Again, push the tines all the way through.

- This is how the Split Pin, the button hook and the band look like with the tines inserted. Notice the different color of the button hook makes it more distinguishable.

- On the other side of the the band, which is the convex side, separate the two times with your finger or finger nail. As they separate, push the tines down toward the band. Doing so will fasten the band and the button hook together.

- Affix the other button hook to the other end of the band with another Split Pin fastener using the same procedure. The finished Ear Saver strap appears below. Notice how the two-tone color approach, one color for the band and another for the button hooks, make the strap more stylish and fashionable.

Using the Ear Saver Strap
This Ear Saver will work for any kind of face mask or surgical mask, especially those with the regular thin ear loop bands. For those non-regular masks that may have thicker ear loop bands, then be sure to cut slightly bigger-sized button hooks to accommodate them.
- Get your face mask and take one of the ear loops or that elastic band that goes around your ear. Hook the ear loop into one of the button hooks of the Ear Saver strap. In the photo below I'm pulling the mask a bit so the ear loop engages well into the button hook.

- With one ear loop inserted into one button hook, position the mask on your face. With one hand holding the strap, reach for the other button hook and engage it to the free ear loop. When fully engaged to the face mask, the Ear Saver strap looks like the one below.

The part on the band that I'm holding is the part that touches you skin or hair. The ends of the band near the button hooks do not touch or scratch or tickle on your skin. The is because the band naturally turns or curls outward.
This is reason why we installed the button hooks on the concave side (outside of the bottle) of the band when we assembled the strap.
- The photo below shows a model wearing the Ear Saver strap. The strap is worn at a low position behind the neck. Again, notice how the end of the band do not touch the skin of the wearer. There is no scratching, chafing or tickling sensation to the skin making the strap very comfortable to wear.

- The model above wears the Ear Saver strap at a low position, but the strap may be worn also at a high or mid level position.

Video Tutorial for the Ear Saver Strap
In summary, here is the video tutorial for this article:
Adjustable and Washable Ear Saver Strap
The Ear Saver strap as shown above may be made fully adjustable by adding more button hooks along the band in between the two existing button hooks at the ends. The process of adding is exactly the same as how the two end button hooks were fastened to the band.
The Ear Saver strap is washable as it's made of tough sheet plastic. It is highly durable also. However, even if damaged, you could easily dispose of it and simply make another one, just as quickly. It's that easy.


Go ahead, post your comment below!