In my modification, for example, I revised the horns slightly to make them look more "bony", hence a bit more realistic. This would make them less rounder or fuller which contributed to that "clip-arty" look. The overall length of the antler didn't change.
Be sure to put the final drawing on a folded piece of paper. In the drawing, I simply moved the shorter horn and added a third one. Do the modified sketches in pencil. When ready, complete the outline with a pen marker.

Forming the Antler Headband Template
After drawing the final version of the antler template on the folded paper, staple on the spaces around the drawing. The staples prevent the folded sheet from shifting when you cut the outline of the antler headband template.
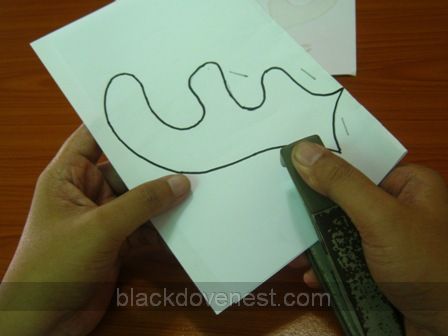
With a pair of scissors, cut along the outline. Keep the contours of the template as smooth as possible. This template will be used for all the antler headbands you'll be making on this project.

After cutting the outline on the folded sheet, you will now be left two identical antler templates. Position them side by side to see if this is the actual design you'd really like to cut from the felt cloth.

How to Assemble the Christmas Reindeer Antler Headband
Materials
- Reindeer Antler Template - 2 pcs. See the procedures above on how to make the templates.
- Masking Tape
- Felt Cloth - Choose the felt cloth that is thicker and harder. This is the kind used for craft projects. The softer felt cloth droops and is used for garments.
- Pen Marker
- Metal Wire - gauge 18. This will be used to provide the inner frame for the antlers.
- Hot Glue Sticks. This will be used to fasten and assemble the components together.
- Headband - plastic, black, with teeth. If the intent is to hide the headband against black hair, then use the black colored one. The plastic headband retains its shape more than the metal kind. The teeth on the inside of the headband secures the antlers by allowing the wire to grip the headband in between the teeth.
Tools
- Ruler
- Scissors
- Cutting Pliers
- Hot Glue Gun
- Long Nose Pliers
Procedure
- Position the two antler templates opposite one another as shown below.

The purpose of this is to save on the felt cloth material.
- Cut very small pieces of masking tape and fasten the points where the two templates meet.

This two-in-one template will be used many times over for the antlers that can be cut from the available felt cloth material.
- Lay the felt cloth flat on your workspace and position the template on it. Rest a ruler on it and press against this ruler to prevent the template from moving around. With a pen marker, draw the outline of the template on the felt cloth.

(See Part 3 for the continuation of this article)


Go ahead, post your comment below!